Looking for ideas for a fun and budget-friendly Princess party! You’re in the right place!
My daughter, Claire, is going to be four this week. Four!
We are moving in just a few short weeks, so we decided to have her birthday party a little early to alleviate some stress. Because even fun, birthday party stress is still stress.
My mom was able to come visit for a few days, and she helped me so much with prepping for the party! We really missed my dad, who is deployed right now, but hopefully he’ll get to be here next year for Claire’s 5th birthday.
Claire has been talking about having a Disney Princess birthday party for…well, since her last birthday. 🙂 This year was the first year we let her invite friends over, so I wanted to make things really fun and special for her.
I think we were successful, despite my concerns about having over 20 people in my small home!
I’ll walk you through what we did to make this event so great!
**Disclaimer: Yeah, this post does have affiliate links. But only to the coolest stuff! I purchased many of these things myself for this party.
Princess Party Dress Up
My daughter is crazy about dressing up, so it was only fitting to have a costume party! When we sent out invitations, we included a piece of paper asking our friends to wear Disney costumes or attire.
(I kept a few of our princess dresses on hand in case anyone needed to borrow one for the party.)
Oh. My. Goodness. When these kids arrived in their little costumes, I just melted! Costumes included Belle, Elena, Moana, a knight/frog, Prince Adam, and Prince Charming.
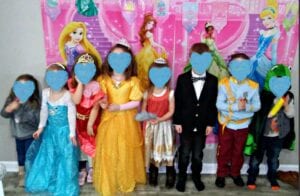
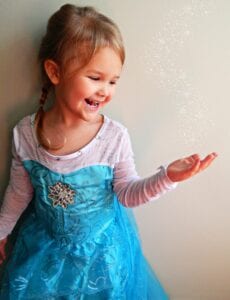
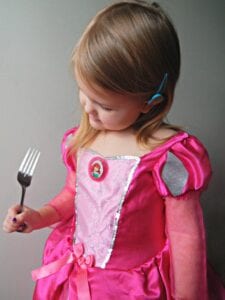
SO Cute. Claire wore this beautiful Elsa dress, a gift from my mom. It was gorgeous. My other little daughter, Kate, wore a tiny Sophia the First dress. She loved dressing up like her big sister!
Some of the adults dressed up too, per Claire’s request. My mother-in-law was Merida, my mom was Cinderella, and I was Elena. I even made an Elena hair accessory so I’d look more the part.
Princess Party Food
We scheduled the party from 9:30-11. The idea was to let everyone keep most of their Saturday and also allow me to keep refreshments simple since the party would be in between meal times.
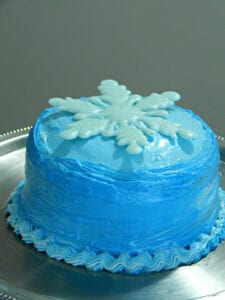
The cake…yeah. The cake. Long story short, I tried to make one of those beautiful mirror cakes, but I didn’t let the marbled glaze cool enough, and it ended in a big mess. So we served cupcakes.
They were yellow to represent Belle and had Ariel and Rapunzel cupcake picks in them. I was going to top the yellow cupcakes with these pretty red icing roses, but I ended up going with the cupcake picks since they were included with the liners I had purchased.

Later in the week, I made this little cake for Claire to have on her real birthday.
I bought little ice cream cups so I could have more time to focus on the guests instead of scooping tons of ice cream. Plus, it meant less trash.
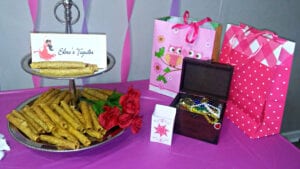
We also served Elena’s Taquitos and Chips (with a picture of Belle and Chip on the label). Of course, we had cute Princess napkins and pink and purple plates for the food.
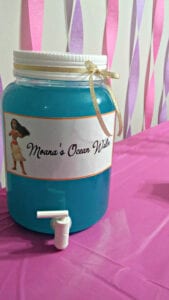
For drinks, we had Moana’s Ocean Water (blue Hawaiian Punch). Simple, simple, but still delicious.
Princess Party Decorations
My goal for the decor was to represent as many Disney Princesses as possible while still looking cohesive. I chose purple, blue, and pink for the main colors, and added pops of gold here and there.

Princess Big Birthday Number
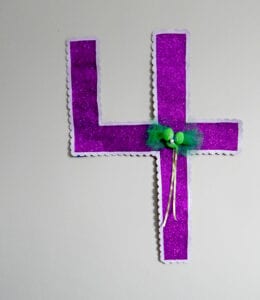
It’s tradition in our family to make a big birthday number to hang on the wall. Since Claire’s favorite princess is Ariel, we made an Ariel-inspired number four.
I drew a four on poster board, painted it with glue, then added fine purple glitter. After the glue dried, I cut out the four. Then I used a scalloped circle punch (I use this ALL the time!) on lavender paper. I cut each circle in half to make them look more seashell flair.
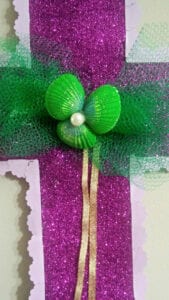
I carefully glued the half circles to the edge of the four with the scalloped sides facing out and the flat sides to the inside. As soon as I was done bordering the four with those, I painted three seashells green.
I dabbed a little blue paint on them as well to give the shells a little more depth. Using green netting fabric, I made a bow and tied it with metallic gold ribbon. Then I hot glued the seashells and a pearl in the center of the bow.
I attached the embellishment to the four, and our number was complete!
Princess Photo Shoot Banner
Above the four, I pinned a long piece of the gold ribbon and attached pictures of Claire to it using glittered clothespins.
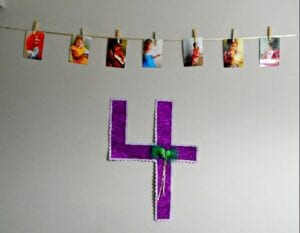
Each picture was of my daughter in a different princess costume. We had had a super fun time doing that silly photo shoot, even with my non-professional photo skills. It added a sweet, personal touch to the decor. Here are a couple of my favorites:
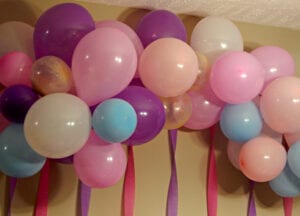
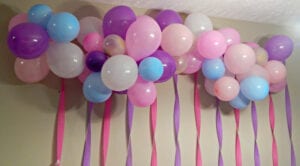
Princess Balloon Arch
I wanted a statement piece above the refreshment table. But as cool as a Cinderella carriage table or a cascading snowflake chandelier would have been, it just wasn’t something my budget allowed.
So I went with a balloon arch, using two multi-colored packs of 20 balloons (the pinks, purple, and white one), about 8 blue balloons, and three clear balloons that I filled with gold glitter.
I blew up about 28 large balloons, and then made the rest of balloons various small sizes. I tied the ends of two large balloons together, and then did the same to two other large balloons. Then twisted the four balloons together.
After that, I carefully sewed three or four smaller balloons to the cluster of four (Sew through the ties- be careful not to pop your balloons!). That counted as one cluster.
Once I made seven more clusters, I attached them all together by sewing straight through the middle ties in each cluster. You’ll want to pull tight and evenly to secure the balloons and prevent sagging thread, but not so tight that the balloons pop.
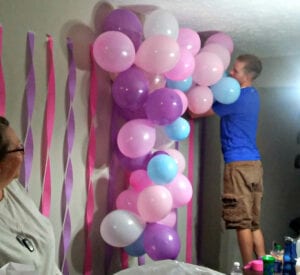
Before hanging the arch, my mom and my husband twisted crepe paper from the ceiling to floor to make a cute and easy backdrop. Then, using four small command hooks and a little more thread, we secured the arch to the wall. I loved seeing my daughter’s face when she saw all the balloons the next morning!
Princess Floral Garland
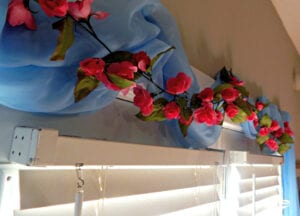
I purchased a little floral garland to wrap around the balloons in the arch, but it turned out to be too heavy. So my mom suggested that I pair it with some “Cinderella” material I had picked up at Goodwill, and we dressed up my back doors with it. It added so much to the room!
Extra Princess Decor
There were some items on the refreshment table that represented several Disney Princess: paper lanterns for Rapunzel (a great and FREE printable from As the Bunny Hops!), a mirror and roses for Belle, seashells and a treasure chest for Ariel, and a fan for Mulan. The cupcake stand had seven princess figurines.
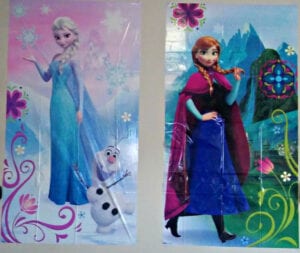
My husband moved our mirrors over to our new house already, so I had a huge wall space to fill. I grabbed this Anna and Elsa five-piece backdrop kit (Look familiar from our Frozen Birthday Party?), and it was perfect. Cheap, huge, pretty, princessy. Here’s what the biggest wall hangings look like:
I originally wanted to hang pretty Disney Princess silhouettes somewhere, but I didn’t think my printer had enough colored ink to do the job. But I thought I’d link these free, pretty silhouettes made by Over the Big Moon in case you want to print them for your party or for a little girl’s room!
Princess Games & Activities
Princess Photo Fun
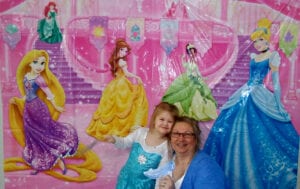
Upon arrival, all the young guests received a little tiara or prince crown to wear at the party and keep. Then I took their picture in front of a huge Disney Princess backdrop.
I loved this backdrop because it had six princesses on it, took up a lot of wall space, and came with 10 paper props. It was totally worth the money!
We had so much fun with it, and it was a great thing to do while waiting on all the guests to arrive and before everyone left. The Cinderella slipper and the Beauty and the Beast Rose were the most popular props.
Another great option is this cool backdrop that you can personalize with your child’s name and has all the Official Disney Princesses on it.
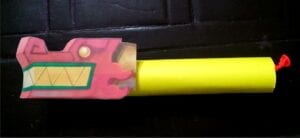
Party Game-Defeat the Huns
Our first game was “Defeat the Huns”. To make this game, my husband used an Exacto blade to carve the top of two project boards to look like mountaintops. He also cut out several large holes in different parts of the “mountains”.
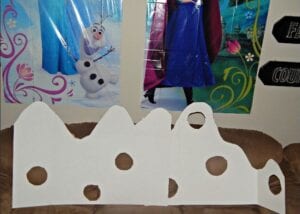
To play the game, my husband put the two project boards and put them side by side to look like a long mountain pass. He sat behind the boards and held a Shan-Yu puppet behind one of the holes.
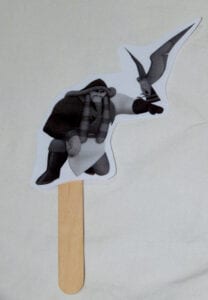
The kids took turns using a marshmallow shooter (dressed up like a Chinese cannon) to shoot marshmallow “snowballs” at the Hun. Once the Shan-Yu was hit, my husband would move him behind a different hole for the next kid to hit.
The kids loved it, and they enjoyed diving after the marshmallows on the floor, too.
I was going to fill a balloon drop with white balloons for Mulan’s “avalanche” to end the game, but we just needed to simplify things.
Party Game-Cross the Bayou
Basically, this game is a Princess Tiana-themed cake walk. To prep for the game, I made 10 lily pads out of construction paper and labeled them 1-10.
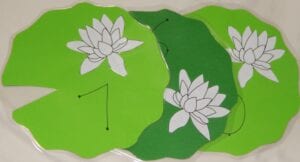
Then I laminated them for added strength. In a bowl, I put little pieces of paper numbered 1-10. I also set up a Disney Princess playlist using songs I had purchased from Amazon in the past.
My playlist included:
“Almost There” from Princess and the Frog
“A Whole New World” from Aladdin
“How Far I’ll Go” from Moana
“The Magic Within You” from Elena of Avalor
“A Dream is a Wish Your Heart Makes” from Cinderella
“Let It Go” from Frozen
“Part of Your World” from The Little Mermaid
“Reflection” from Mulan
“Belle” from Beauty and the Beast
I kept this playlist for when my girls want to dress up and dance, and I’ll use it on our next road trip!
I highly recommend buying the Disney Princess: Fairy Tale Songs CD because it is way cheaper than buying all these songs individually, and it comes with the MP3 files for free.
I wish I had gone that route because most of the songs on my playlist are on that cd, and I would’ve gotten more bang for my buck.
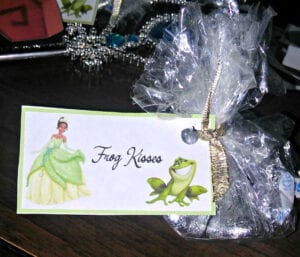
When it was time to play the game, I put the lily pads in a circle and told the kids to hop from lily pad to lily pad while music was playing. When the music stopped, the kids froze on the lily pad they were on. I drew a number from a bowl, and the child that stood on that lily pad number won a prize. I made these little “Frog Kisses” (Hershey’s Kisses) for the prize.
The number went back into the bowl, and we repeated this until all the kids got a prize. If a child “won” again, we just drew another number.
There are many ways you can adapt this game for different princesses! For Ariel, you can jump on numbered bubbles and pass out a Swedish Fish favor.
For Jasmine, try making numbered magic carpets and offer Ring Pop “jewels” as a prize. You can make Pocahontas leaves and have a Skittles or M&M’s prize to represent the “Colors of the Wind”.
If you want to do a traditional cake walk where the prize is a mini cake (like Little Debbie Cakes), print off Aurora’s funny 16th birthday cake on 10 sheets of paper for the kids to walk on. You get the idea.
Party Game-All Tangled Up!
Our friends had a blast playing this Tangled game from Julie and James Paquette! We split the kids into pairs, and then they each got a turn to tangle and be tangled.

After we played games and ate, we opened presents and took more pictures by the backdrop. We had so much fun!
We’ll leave the decorations up all week, and the house will be ready for Claire’s real birthday!
I hope these ideas help you throw an amazing Disney Princess party!
-Mariah
Parties? We love parties. Check out our ideas for a Frozen Birthday Party, a Chess-themed party, 5 awesome birthday traditions from Maegan’s family, and of course, our Party Ideas board on Pinterest!
What an awesome party!! Happy birthday, Claire!! Your mom and grandmother created a wonderful party for you and your friends! I love Disney princesses too! ❤️
Thank you! That means so much. It was easy for me to get excited about the theme she wanted :). And Claire is curious about who your favorite Disney princess is?
Sounds like an awesome time! My hubby and I recently had our honeymoon in Disney and I can’t get enough. Even though I will be turning much older than 4 this seems like a party idea that could be carried out for the young at heart!
Thank you for your comment, Rebecca, and congrats on your marriage!! Oh my goodness, a Disney honeymoon sounds like a DREAM!
I love how it is sort of impossible to outgrow the magic of Disney! You could totally adapt some of these ideas for a beautiful, grown-up Disney party.
So cute! What a fun party idea!
Thank you so much 🙂 Welcome to This Blue Dress!
P.s. I love love love your blog name!
Oh man this sounds like an awesome party! What a wonderful way to celebrate your daughter!
Lauren, thank you so much!! I’m so glad you liked this post!
You did a great job with the party! Love the cupcakes, and that you had a little photo shoot of Disney princesses with your daughter. Such a clever idea!
-Lauren
http://www.shootingstarsmag.net
We had so much fun with the photo shoot, I can’t even tell you. My daughter loved the attention I was able to give her, and I got to spend time with her and practice taking pictures (I’ve got a looong way to go with learning photography). If you ever want to spend some fun, quality time with someone, I recommend doing something like that 🙂
Lauren, thank you for your comment! I really appreciated it!
My daughter just turned 1, and I am so excited for the day when she requests a princess party! This looks so fun, and you thought of all the details. Especially love the creative games you had.
Isn’t having a daughter so much fun?! The request for a princess theme will come soon, and I hope you have a blast when it does. 🙂 You can pin this post if you want to save some ideas for the future. Thank you for your sweet comments, Holly!
I bet that was so much fun. We did a Disney Princess party for my daughter’s fourth! I loved the cake. It had a few tiers. And my husband made a cardboard Rapunzel with hair that went down to the first story of the house off the deck!
No way, that’s awesome!! 🙂 And that Rapunzel sounds AMAZING- what a showstopper! I bet you and your husband had a blast throwing that party. Thank you for sharing!
This looks like a fabulous party! My daughter used to be obsessed with Disney Princesses and would have loved this.
Thank you so much, Amber! 🙂
Wow, this themed party seems fun. Now it puts me a party mood and I want to throw a princess party for my daughter too this spring. Gotta get a bit organized and do some planning.
I hope your party is a success! 🙂 It will make your daughter smile so much.
I do love the idea of a Disney Princess party. This is so cute and creative
Thanks for your sweet comment! <3
That is so exciting to celebrate your daughter’s birthday to a new house with the family. You did a a great job with all the decorations and food, The cake looks good too. Its my dream when I was a kid to have a Disney princess party. Your daughter is a lucky girl!
It has been a really crazy few weeks, (and year) but it’s all been worth it. I appreciate your comment! You’re so sweet! 🙂
This is such a cute DIY disney party! My daughter would love this because she is obsessed with anything princess related!
Thank you, Jessica! You can save these ideas for later if you decide to do this theme for your daughter. I think she would love it 🙂
Princess parties are always a blast! These are some really cute and pretty ideas!
Princess parties really are the best! Thank you for your kind comment, Angela!
Ahh lovely! I have two girls who are obsessed with Disney princess so they would love this! I love a princess theme!
Do it, do it! 🙂 These ideas are easy to customize, simplify, or add on to! Your girls would have a blast!
Adorable party! I rememeber having Disney princess parties as a little girl. Best memories of my childhood.
Me, too! Disney is the best! Did you have an all-princess party or a party centered around one specific princess?
I think you did an amazing job for the party! It’s really wonderful how the decorations came together. Love all of their costumes as well. The games were perfect!
Thank you so much! 🙂 It was a lot of work, but seeing all the little smiles made it worth while. I wish the pictures did the costumes justice- they were UNBELIEVABLY adorable.
Great party! Your idea is unique. I’m sure the little princess was endlessly happy. What a man does not make for the children’s happiness. You’ve done wonderful. This party will leave a memory to the child. It deserves your efforts.
Thank you, this was a really sweet comment!! Made my day!
Hope your little one has an amazing time at her party, even if it’s a little early. My daughter would have loved a princess party and these games when she was younger. She would have loved something with Merida or Cinderella but Tiana and Rapunzel would have been good too.
Thank you so much for the birthday wishes! 🙂
sounds like such a great party! what a cool theme for a little girl! disney princesses are amazing! i would have loved to be mulan as a kid!
Thanks, Corrine! It was seriously so fun to plan and host this. Our love of Disney is deeeeep.
Also- it’s not too late to have a Mulan party, even as an adult 😉
What a beautiful party! Every 4 year olds dream come true and she looks SO happy!
I loved seeing her smile all day! All the preparation was totally worth it. 🙂 I appreciate your comment!!
These are nice tips and ideas! My niece will surely love a Disney themed party.
Thank you, Hannah! Oh, your niece would definitely enjoy this party theme. There’s just something magical about Disney! You can easily customize everything if she loves a particular princess or character, too! 🙂
Happy 4th bday to your daughter. You can never go wrong with a Disney princess party.
Thank you! 🙂 I have to admit, I was thrilled when she told me what theme she wanted, because it was something I could totally get into.
This sounds like a great party! These are nice tips and ideas! i would have loved to be mulan as a kid!
Aww i used to love disney princess parties as a kid! These are so cute and wonderful ideas 🙂
Deb, thank you very much!! 🙂
I can imagine how my niece would love this kind of theme for her party. She likes to play Princess.
She would think it was an incredible party! This theme is really popular, so there are tons of party supplies you can easily gather together for the celebration. 🙂
A party like this will forever be cherished by the girls. Feeling like a princess on your own party is so sweet…
Thank you! <3